Wednesday, November 10, 2010

ROLLERCOASTER

Roller Coaster
For many people, there is only one reason to go to an amusement park: the roller coaster. Some people call it the "scream machine," with good reason. The history of this ride reflects a constant search for greater and more death-defying thrills.
How does a roller coaster work?
What you may not realize as you're cruising down the track at 60 miles an hour is that the coaster has no engine. The car is pulled to the top of the first hill at the beginning of the ride, but after that the coaster must complete the ride on its own. You aren't being propelled around the track by a motor or pulled by a hitch. The conversion of potential energy to kinetic energy is what drives the roller coaster, and all of the kinetic energy you need for the ride is present once the coaster descends the first hill..

Once you're underway, different types of wheels help keep the ride smooth. Running wheels guide the coaster on the track. Friction wheels control lateral motion (movement to either side of the track). A final set of wheels keeps the coaster on the track even if it's inverted. Compressed air brakes stop the car as the ride ends.
Wooden or steel coaster: Does it make a difference?
Roller coasters can be wooden or steel, and can be looping or nonlooping. You'll notice a big difference in the ride depending on the type of material used. In general, wooden coasters are nonlooping. They're also not as tall and not as fast, and they don't feature very steep hills or as long a track as steel ones do. Wooden coasters do offer one advantage over steel coasters, assuming you're looking for palm-sweating thrills: they sway a lot more. Tubular steel coasters allow more looping, higher and steeper hills, greater drops and rolls, and faster speeds.
   

Projectile motion

Falling

At a given location on the earth and in the absence of air resistance, all objects fall with the same uniform acceleration. Thus, two objects of different sizes and weights, dropped from the same height, will hit the ground at the same time.
Drop

An object is controlled by two independant motions. So an object projected horizontally will reach the ground in the same time as an object dropped vertically. No matter how large the horizontal velocity is, the downward pull of gravity is always the same.


Here are the formulas that describe projectile motion:


Once the object leaves the table, it
experiences a downward acceleration equal
to gravity. Thus the vertical velocity(Vy) is
continually increasing. The horizontal
velocity(Vx) remains constant and is equal to
Vxo.The two vectors Vx and Vy are added
together to get the velocity at each point on
the path.
If an object is pointed at an angle, the motion
is essentially the same except that there is
now an initial vertical velocity(Vyo). Because
of the downward acceleration of gravity, Vy
continually decreases until it reaches its
highest point, at which it begins to fall
downward.

Monday, November 1, 2010

ADDING VECTORS

Vector Addition

A variety of mathematical operations can be performed with and upon vectors. One such operation is the addition of vectors. Two vectors can be added together to determine the result (or resultant). This process of adding two or more vectors has already been discussed in an earlier unit. Recall in our discussion of Newton's laws of motion, that the net force experienced by an object was determined by computing the vector sum of all the individual forces acting upon that object. That is the net force was the result (or resultant) of adding up all the force vectors. During that unit, the rules for summing vectors (such as force vectors) were kept relatively simple. Observe the following summations of two force vectors:


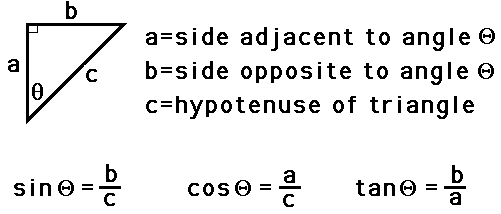
Then use Pythagorean Theory to measure the resultant of the vectors.

EXAMPLE:


To get the Angle of the Resultant:


http://faraday.physics.utoronto.ca/PVB/Harrison/Flash/Vectors/Add3Vectors.html

Saturday, October 23, 2010

Deriving Equations

(3) d = v1Δt + ½aΔt²

Derive from (2) v2= v1 + at

Substitute V2 to V1 to (1) d = 1/2 (v1+v2) t

(4) d = v2Δt - ½aΔt²

Deive from (2) v1= v2 - at

Substitue V1 to V2 to (1)

(5)v2² = v1² + 2ad

Multiply (1) and (2)

(3) d = v1Δt + ½aΔt²
d= area of the rectangle + area of the triangle     
= v1Δt + ½(at)Δt                 
= v1Δt + ½aΔt²

(4) d = v2Δt - ½aΔt²
d = area of the large rectangle - area of the triangle
= v2Δt  - ½(at)Δt
= v2Δt - ½aΔt²

Wednesday, October 13, 2010

  • This is d,t graph
  • From the starting point , I moved away from the starting point [E] by constant speed
  • Then, i stopped for a while and walked towards the starting point [W] for few secods
  • Then, stopped for the rest of motion


  • This is v,t graph
  • The velocity was 0 for 2 seconds , which means the stopped motion
  • The velocity was 0.5 after 2 seconds until 5 seconds ; walking motion [E]
  • The velocity was 0 at 5 seconds until 7 seconds; no motion
  • The velocity was -0.5 until ends ; walking motion [w]
  • v,t graph
  • velocity was increased 0 to 0.5 until 4 sec; speeding motion [E]
  • From 4 sec the velocity was constant until 6sec ; constant speed [E]
  • From 6 the velocity was -0.4 until 9 sec ; slower speed [w]
  • Then, the motion stopped from 9sec
  • d,t graph
  • Started from 1 m , moved constant speed until 3sec ; moving [E]
  • 3 to 7 sec rest motion 
  • 7 to 10 ; moving constant speed[E] 
  • v,t graph
  • speed [E]was constant until 3 sec and 4 sec to 7 sec the speed was [W] constant then the motion stopped from 7 sec
  • This is d , t graph 
  • started from 3 m , constant speed [W]
  • 3 second rest motion until 4 sec
  • 4 sec constant speed [W] until 5 sec
  • 5 sec rest motion until 7 sec
  • 7 sec to 10 sec constant speed [E] to 3m

Thursday, September 30, 2010

Motor Building

In the beginning, I was full of excitement to make our own motor with Edward. The process of making motor was easier than i expected. Rather than reading the instruction on workbook, we observed the motors that were made by previous students. For 30 minutes, we hammered four nails down and we took hard time to align the nails to adjust the right proportion. Then, we made the spinning part of the motor which was just a stick into a wine cork. Then, I sanded the brushes which will conduct electricity to the commutator. Commutators were attached on one side of the cork. We coiled the cork.